S-Curve Motion offers a smoother acceleration profile compared to Trapezoidal Motion, utilizing a "Jerk Percent" parameter to fine-tune how acceleration phases are shaped, allowing precise control over motion transitions and peak accelerations.
🔹 What is S-Curve Motion?
S-Curve Motion initiates a point-to-point motion using an “S” shaped velocity profile similar to that shown below.
This move type generates a motion that takes the same time as a trapezoidal move but allows the acceleration to have smoother transitions.
This comes at the expense of requiring larger peak accelerations and decelerations. The total move time is always the same as the equivalent trapezoidal move.
- Note
- You can change the velocity, acceleration, and deceleration of a MoveSCurve that is executing on the fly simply by calling the function again with different parameters.
🔹 S-Curve Motion Overview
| Jerk % | Notes | Acceleration | Velocity |
| 0% |
Acceleration is always constant. This is the same as a Trapezoidal move profile.
Peak Acceleration is specified by the user.
| .png) | .png) |
| 50% |
Acceleration is ramping 50% of the time and constant for 50% of the time.
Peak Acceleration is 133% of the value specified by the user.
| .png) | .png) |
| 100% |
Acceleration is ramping 100% of the time and is never constant.
Peak Acceleration is 200% of the value specified by the user.
| .png) | .png) |
.png)
🔹 What is Jerk Percent?
Jerk percent is the percentage of time spent with non-zero jerk during the acceleration and deceleration segments of moves.
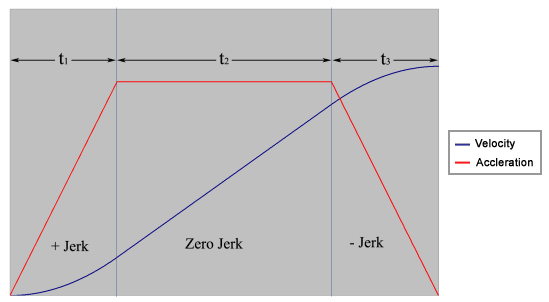
For the above diagram, the jerk percent is calculated as:
\[Jerk\_Percent \;=\; \frac{t_{1} + t_{3}}{t_{1} + t_{2} + t_{3}} \times 100\%
\]
If the jerk percent for a move is zero, then it imitates a trapezoidal move.
For moves that use jerk percent, the acceleration and deceleration arguments represent the average acceleration and deceleration values for the move, not the peak values. As a consequence, the time of the move remains independent of the jerk percent value, which allows users to more easily calculate the time of a move. For point-to-point moves, this time is the same as a trapezoidal move with the same move parameters.
In many applications it is important to know the maximum acceleration and deceleration of a particular move. As discussed earlier, when using jerk percent, the average acceleration and decelerations are specified (not the maximum values). Fortunately, there is a simple conversion between average and maximum accelerations.
Maximum Acceleration
Changing the Jerk Percent will change the max acceleration given by this formula:
\[\displaystyle
max\_accel \;=\; \frac{accel}{1 - \bigl(jerk\_percent \cdot 0.005\bigr)}
\]
max_accel: the maximum acceleration (or decel) for a point-to-point profile.
accel: the specified acceleration (or decel) used with MoveSCurve.
jerk_percent: the specified jerk percentage (0 to 100.0) from the application code.
- Note
- The values passed to the function MoveSCurve() will be multiplied internally by the specified user units (AKA: counts per unit). The reason for this is to avoid creating an extra input array. We simply just use the same array you have passed to the function. Therefore, the values passed to the function might not be the same ones once the function has been triggered.
🔹 S-Curve Behavior for Short Moves
While S-Curve motion is designed for smooth, continuous profiles, its execution on a time-sampled system (such as the RMP's 1ms (default) servo sample) introduces quantization effects. This is most apparent during very short-duration moves. The firmware precisely tracks theoretical frame durations, even those with non-integer sample values, by accumulating time across servo samples. However, the commanded output is only updated once per sample, which can lead to the following distinct motion patterns:
1. Full S-Curve Profile (Moves >= 4 sample periods)
When commanded parameters result in a theoretical move time spanning several sample periods (typically 4 samples or more), the MoveSCurve function generates a near-ideal S-curve. The motion profile will consist of up at least four jerk phases: positive jerk (acceleration ramp-up), negative jerk (acceleration ramp-down to cruise or deceleration), negative jerk (deceleration ramp-up), and positive jerk (deceleration ramp-down). The result is a smooth change in acceleration, closely matching the theoretical profile.
2. Trapezoidal/Triangular Profile (Moves ≈ 3 sample periods)
As commanded parameters become more aggressive, the theoretical S-curve segments compress. If the total move time is short enough to be executed over just three sample periods, the profile will appear as a trapezoidal or triangular velocity profile. The firmware still calculates the S-curve with fractional time durations, but at the sample resolution, the continuous change in acceleration is effectively averaged out, resulting in a profile that presents as piecewise-constant acceleration.
3. Two-Sample Profile (Moves ≈ 2 sample periods)
Further increasing the aggressiveness can lead to a theoretical move time that executes over exactly two sample periods. In this scenario, the MoveSCurve function generates a profile that is distinctly triangular. The acceleration and deceleration phases each occur within a single sample period.
4. Single-Sample "Step" Move (Moves ≈ 1 sample period)
For extremely aggressive parameters where the theoretical move time is significantly less than two sample periods, the system cannot generate a multi-segment profile. Instead, it executes an instantaneous "step" move. The axis is commanded to the target position in the next servo sample, bypassing any profile generation. This is the fastest possible transition, limited only by the firmware's sample rate.
Key Takeaways
This quantization behavior highlights the practical limits of achieving perfectly smooth motion on a sampled control system.
- For the smoothest motion, select parameters (velocity, acceleration, distance) that result in move times of at least 4 sample periods.
- For very fast moves (< 4 sample periods), expect the velocity profile to degenerate from a pure S-curve into a trapezoidal, triangular, or single-step command.
- Mechanical Considerations: Be aware that the high rates of acceleration and jerk in 2-sample and "step" moves can have significant mechanical implications for your system, and will rely on the tuning of your Axis to handle these transitions without overshoot or instability.
- Verification: Use a tool like the RapidSetupX Scope to plot the commanded position and velocity to observe how quantization affects your specific motion profile.
📜 Sample Code
Basic SCurve Motion
- C#
axis.
MoveSCurve(POSITION, VELOCITY, ACCELERATION, DECELERATION, JERK_PERCENT);
- C++
const int NUM_AXES = 1;
const int AXIS_INDEX = 0;
const double POSITION_0 = 0;
const double POSITION_1 = 0.5;
const double VELOCITY = 1;
const double ACCELERATION = 10;
const double DECELERATION = 10;
const double JERK_PERCENT = 50;
const double FINAL_VELOCITY = 0.5;
std::cout << "SCurve Motion:" << std::endl;
std::cout << "Moving to position: " << POSITION_1 << std::endl;
std::cout << "Motion Complete" << std::endl;
std::cout << "Moving back to position: " << POSITION_0 << std::endl;
std::cout << "Motion Complete\n" << std::endl;
Multi-Axis SCurve Motion
- C#
Console.WriteLine("📜 MultiAxis Motion: Point to Point");
int exitCode = 0;
Console.WriteLine($"Axis Count: {controller.AxisCountGet()}");
try
{
Helpers.VerifyHardwareUsage(controller);
Helpers.VerifyAxisCount(controller, minRequiredSampleAxisCount: 2, minRequiredSampleMultiAxisCount: 1);
int axisCount = controller.AxisCountGet();
{
}
MultiAxis multi = controller.LoadExistingMultiAxis(axisCount);
double[] positions1 = [ 5, 10 ];
double[] positions2 = [ 15, 15 ];
double[] velocities1 = [ 10, 10 ];
double[] velocities2 = [ 10, 10 ];
double[] accelerations = [ 20, 20 ];
double[] decelerations = [ 20, 20 ];
double[] jerkPercent = [ 50, 50 ];
Console.WriteLine($"\nMove 1 (S-Curve): Positions = [{positions1[0]}, {positions1[1]}]");
multi.
MoveSCurve(positions1, velocities1, accelerations, decelerations, jerkPercent);
Console.WriteLine($"Axis 0 CommandPosition: {axis0.CommandPositionGet()} (expected: {positions1[0]})");
Console.WriteLine($"Axis 1 CommandPosition: {axis1.CommandPositionGet()} (expected: {positions1[1]})");
Console.WriteLine($"\nMove 2 (Trapezoidal): Positions = [{positions2[0]}, {positions2[1]}]");
multi.
MoveTrapezoidal(positions2, velocities2, accelerations, decelerations);
Console.WriteLine($"Axis 0 CommandPosition: {axis0.CommandPositionGet()} (expected: {positions2[0]})");
Console.WriteLine($"Axis 1 CommandPosition: {axis1.CommandPositionGet()} (expected: {positions2[1]})");
Console.WriteLine("\nMulti-axis point-to-point motion complete.");
}
catch (Exception e)
{
Console.WriteLine($"❌ Error: {e.Message}");
}
finally
{
controller.Delete();
}
return exitCode;
Constants used in the C# sample apps.
const bool USE_HARDWARE
Default: false.
const int EXIT_FAILURE
Exit code for failed execution.
const int AXIS_0_INDEX
Default: 0.
const int AMP_ENABLE_MS
Default: 750.
const int EXIT_SUCCESS
Exit code for successful execution.
const int AXIS_1_INDEX
Default: 1.
void PositionSet(double position)
Set the Command and Actual positions.
Represents a single axis of motion control. This class provides an interface for commanding motion,...
static MotionController * Get()
Get an already running RMP EtherCAT controller.
Represents the RMP soft motion controller. This class provides an interface to general controller con...
void MoveTrapezoidal(const double *const position, const double *const vel, const double *const accel, const double *const decel)
Point-to-point trapezoidal move.
void AxisRemoveAll()
Remove all axes from a MultiAxis group.s.
void MoveSCurve(const double *const position, const double *const vel, const double *const accel, const double *const decel, const double *const jerkPct)
Point-to-point S-Curve Move.
void AxisAdd(Axis *axis)
Add an Axis to a MultiAxis group.
Represents multiple axes of motion control, allows you to map two or more Axis objects together for e...
void ClearFaults()
Clear all faults for an Axis or MultiAxis.
void Abort()
Abort an axis.
int32_t MotionDoneWait(int32_t waitTimeoutMilliseconds=WaitForever)
Waits for a move to complete.
int32_t AmpEnableSet(bool enable, int32_t ampActiveTimeoutMilliseconds=AmpEnableTimeoutMillisecondsDefault, bool overrideRestrictedState=false)
Enable all amplifiers.
Helpers namespace provides utility functions for common tasks in RMP applications.
- C++
const int AXIS_COUNT = 2;
const int AXIS_X = 0;
const int AXIS_Y = 1;
const int MOTION_COUNT = 1;
const double USER_UNITS = 1048576;
const double START_POSITION[AXIS_COUNT] = { 0, 0 };
const double END_POSITION[AXIS_COUNT] = { 1, 2 };
const double VELOCITY[AXIS_COUNT] = { 1, 2 };
const double ACCELERATION[AXIS_COUNT] = { 10, 20 };
const double DECELERATION[AXIS_COUNT] = { 10, 20 };
const double JERK_PERCENTAGE[AXIS_COUNT] = { 0, 0 };
if (USE_HARDWARE)
{
}
else
{
}
try
{
controller->MotionCountSet(controller->AxisCountGet() + 1);
Axis* axisX = controller->AxisGet(AXIS_X);
Axis* axisY = controller->AxisGet(AXIS_Y);
MultiAxis* multiAxisXY = controller->MultiAxisGet(controller->MotionCountGet() - 1);
printf("\nMotionStart...");
multiAxisXY->
MoveSCurve(END_POSITION, VELOCITY, ACCELERATION, DECELERATION, JERK_PERCENTAGE);
PrintResult(axisX, axisY);
printf("\nMotionStart...");
multiAxisXY->
MoveSCurve(START_POSITION, VELOCITY, ACCELERATION, DECELERATION, JERK_PERCENTAGE);
PrintResult(axisX, axisY);
printf("\nTrapezoidal Motion Done\n");
}
{
printf("\n%s\n", err.text);
return -1;
}
controller->Delete();
return 0;
Motion: Modify
This sample application demonstrates how to use change the velocity parameter of a motion that is partially complete.
- C#
axis.
MoveSCurve(POSITION, VELOCITY, ACCELERATION, DECELERATION, JERK_PERCENT);
Console.WriteLine($"\tPosition commanded: {POSITION}");
Thread.Sleep(10);
Console.WriteLine($"\tPosition before speed change: {axis.CommandPositionGet()}");
axis.
MoveSCurve(POSITION, VELOCITY * 10, ACCELERATION, DECELERATION, JERK_PERCENT);