

|
APIs, concepts, guides, and more
|

|
APIs, concepts, guides, and more
|
Utilize RapidSetup for master-based DS402 homing, which although subject to EtherCAT network latency, provides comprehensive control over homing methods, safety settings, and parameters for precise motion initialization.
Homing is the process of establishing a consistent starting point, enabling precise motion control to specific positions within your workspace.
Master-Based Homing refers to a homing sequence managed by the master controller (e.g., an industrial PC or PLC with EtherCAT master capabilities). In this case, the homing process is handled by the RMP Motion Controller. The RMP sends commands to the drive to move the motor in a controlled manner while continuously monitoring feedback signals such as limit switches, encoders, or sensors via the drive or other I/O devices.
The master evaluates these signals to determine when homing is complete and sets the position reference accordingly.
Before trying to perform a homing routine, please revise the following:
RMP Master-Based homing can be done via the following:
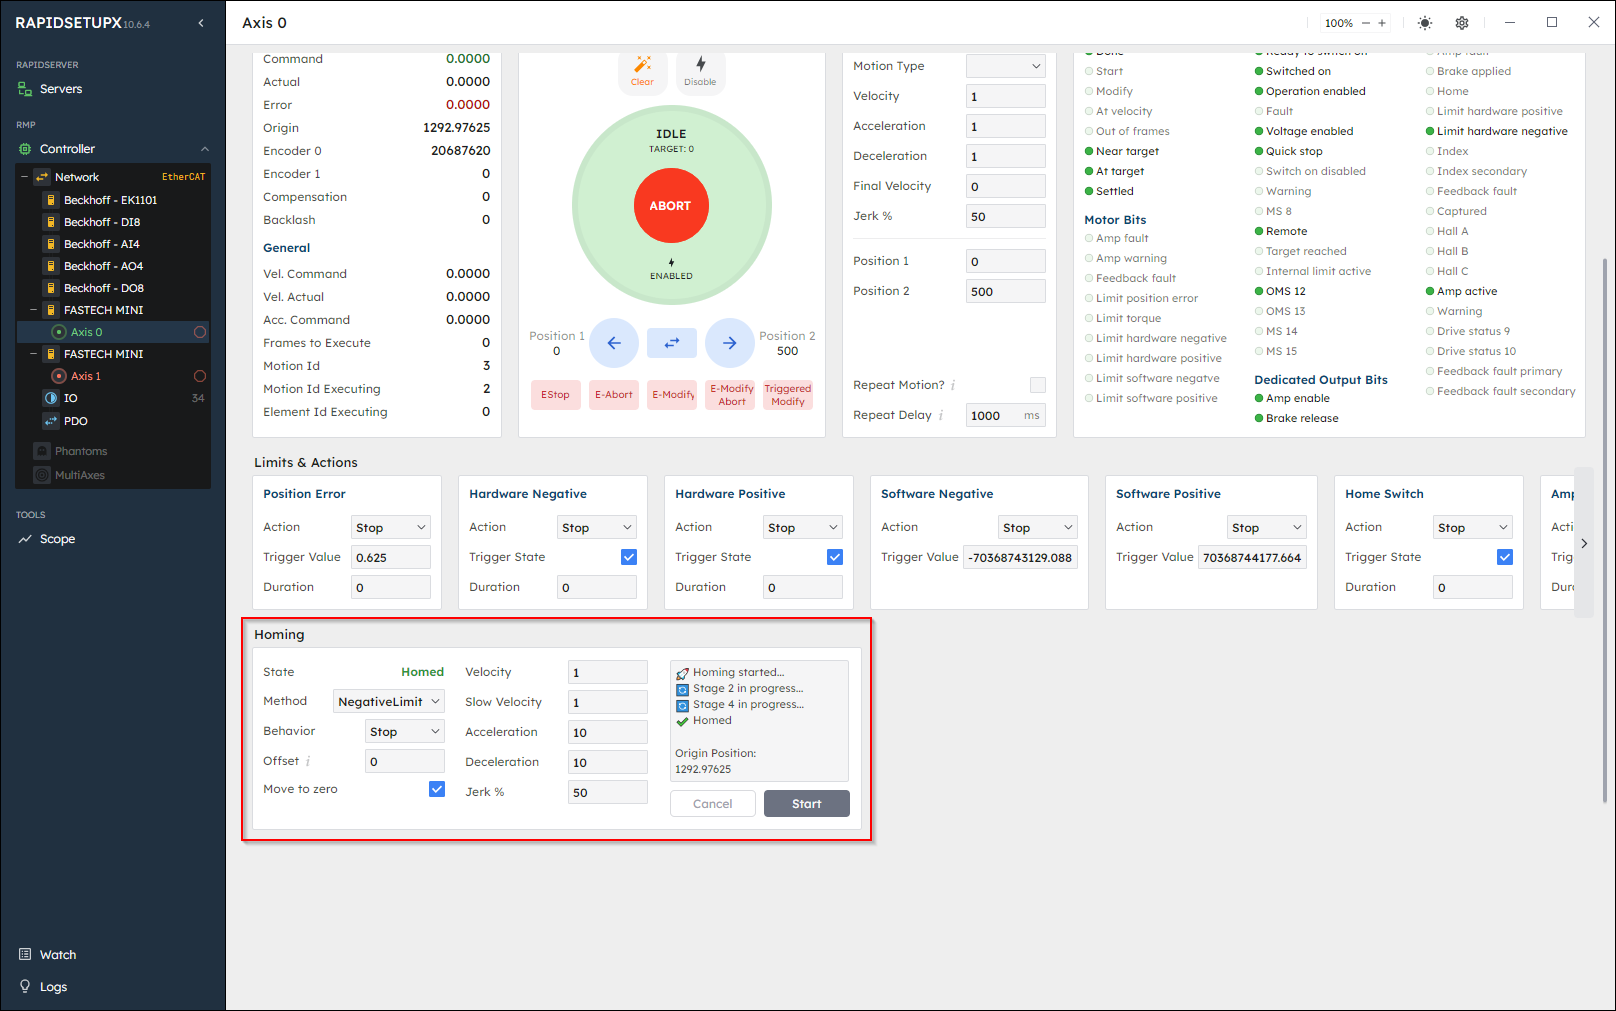
See the Axis Homing Section methods.
or set all four stages to the same velocity using:
HomeVelocitySet(double velocity)
(100) None (Default Setting)

(101) NegativeLimitSwitch RightIndex (102) PositiveLimitSwitch LeftIndex

(103) PositiveHome LeftIndex (104) PositiveHome RightIndex

(105) NegativeHome RightIndex (106) NegativeHome LeftIndex

(107) RisingHome LeftIndex PositiveStart (108) RisingHome RightIndex PositiveStart

(109) FallingHome LeftIndex PositiveStart (110) FallingHome RightIndex PositiveStart

(111) FallingHome RightIndex NegativeStart (112) FallingHome LeftIndex NegativeStart

(113) RisingHome RightIndex NegativeStart (114) RisingHome LeftIndex NegativeStart

(117) NegativeLimitSwitch (118) PositiveLimitSwitch

(119) PositiveHome NegativeMomentum (120) PositiveHome PositiveMomentum

(121) NegativeHome PositiveMomentum (122) NegativeHome NegativeMomentum

(123) RisingHome NegativeMomentum PositiveStart (124) RisingHome PositiveMomentum PositiveStart

(125) FallingHome NegativeMomentum PositiveStart (126) FallingHome PositiveMomentum PositiveStart

(127) FallingHome PositiveMomentum NegativeStart (128) FallingHome NegativeMomentum NegativeStart

(129) RisingHome PositiveMomentum NegativeStart (130) RisingHome NegativeMomentum NegativeStart

(133) Negative Index (134) Positive Index

(135) Current Position
.png)
(136) Negative Hard Stop (137) Positive Hard Stop
.png)
Value: 0 - No Homing (Default Setting)

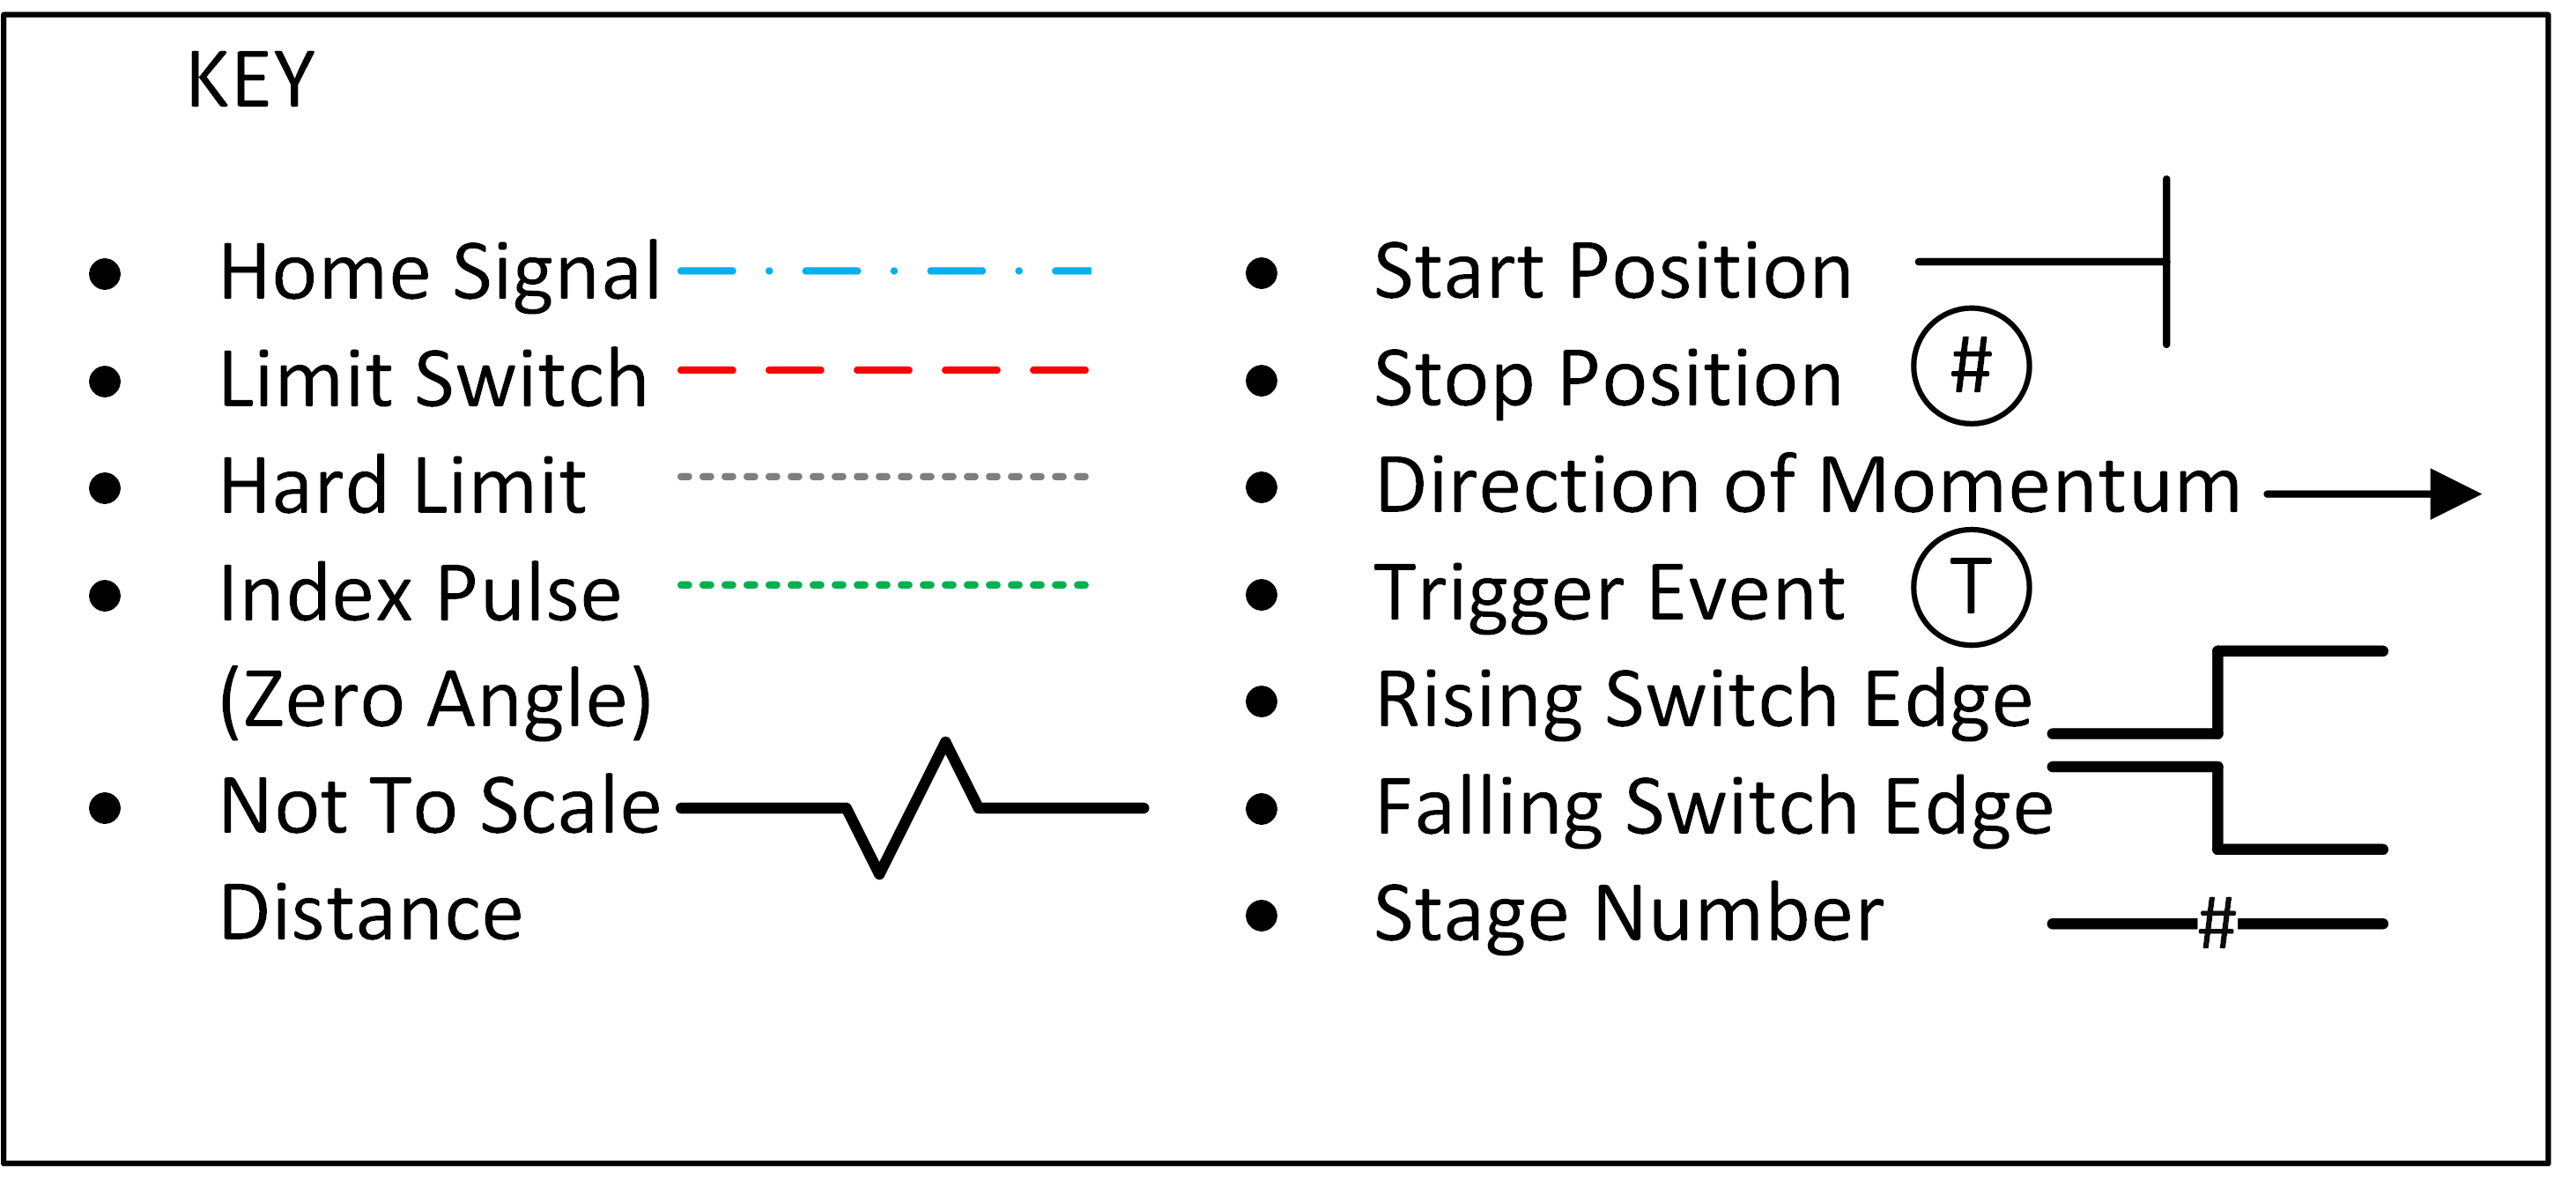
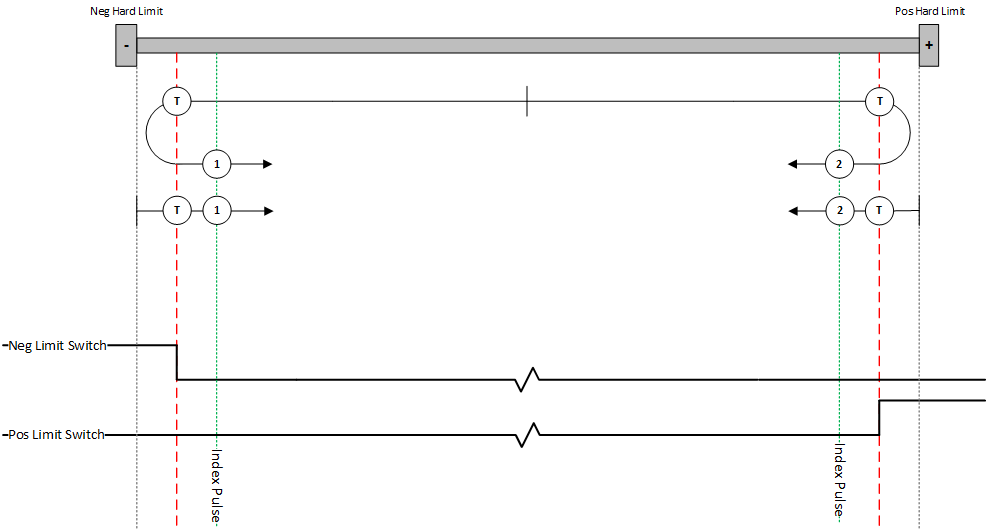
Value: 1 and 2 - Homing with the negative/positive limit switch and index pulse
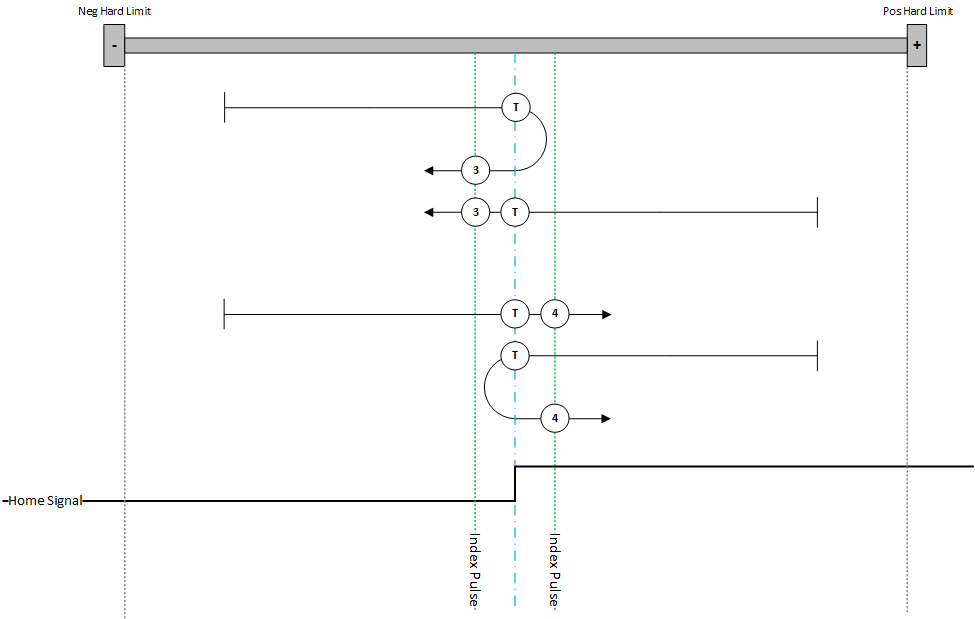
Value: 3 and 4 - Homing on the positive home switch and index pulse
Value: 5 and 6 - Homing on the negative home switch and index pulse
.png)
Value: 7 and 8 - Homing with the home switch input signal and index pulse starting in the positive direction
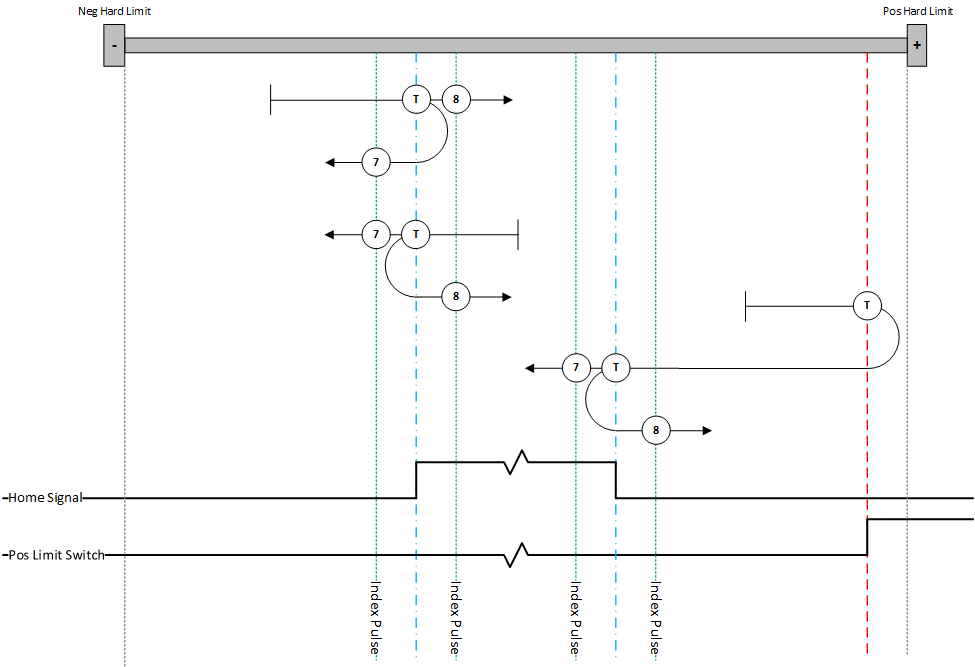
Value: 9 and 10 - Homing with the home switch input signal and index pulse starting in the positive direction
.png)
Value: 11 and 12 - Homing with the home switch input signal and index pulse starting in the negative direction
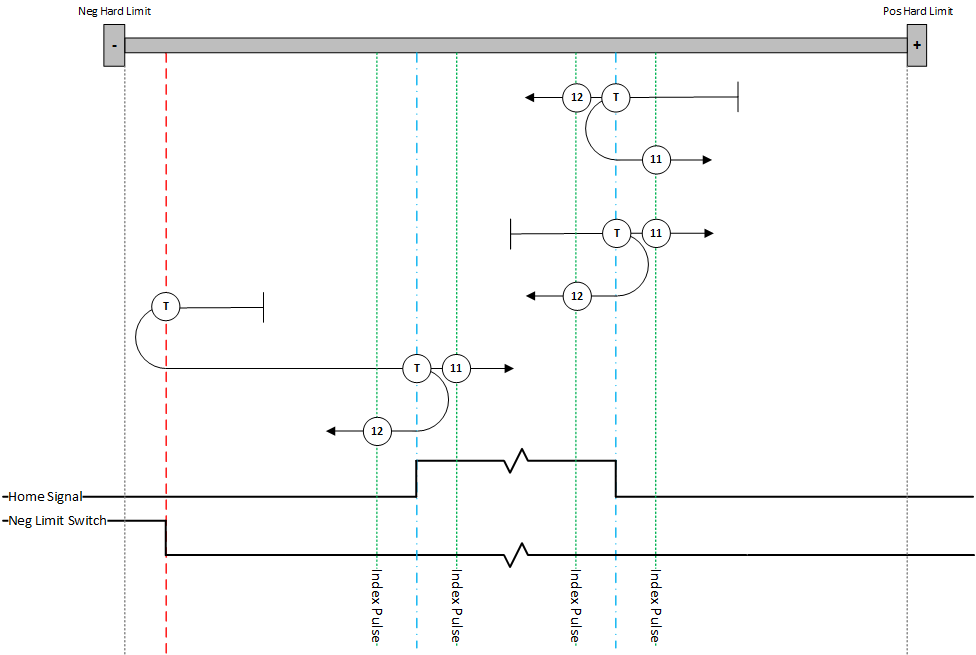
Value: 13 and 14 - Homing with the home switch input signal and index pulse starting in the negative direction
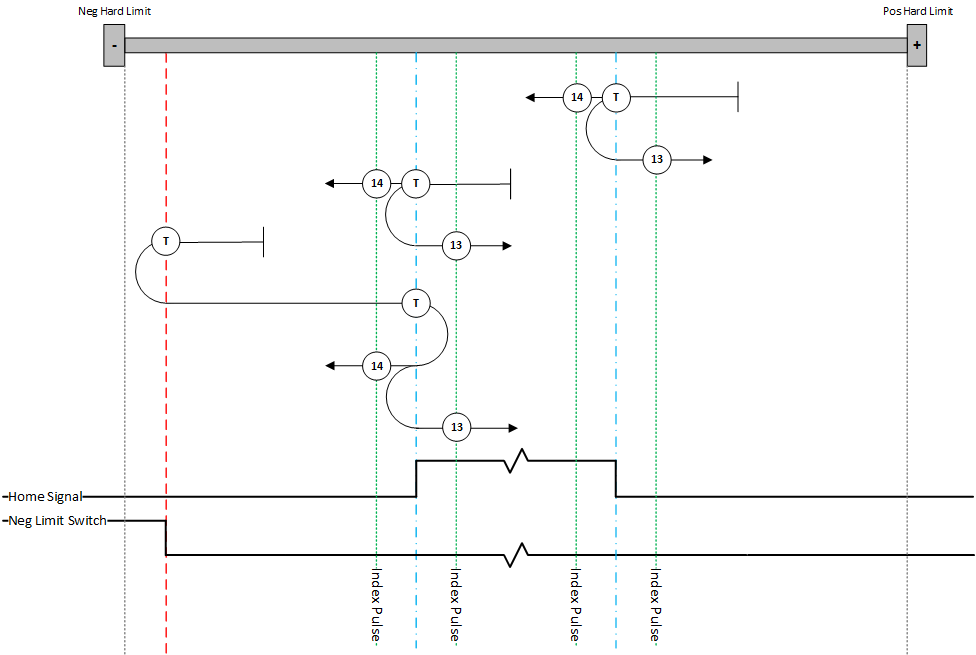
Value: 17 and 18 - Homing with the negative/positive limit switch
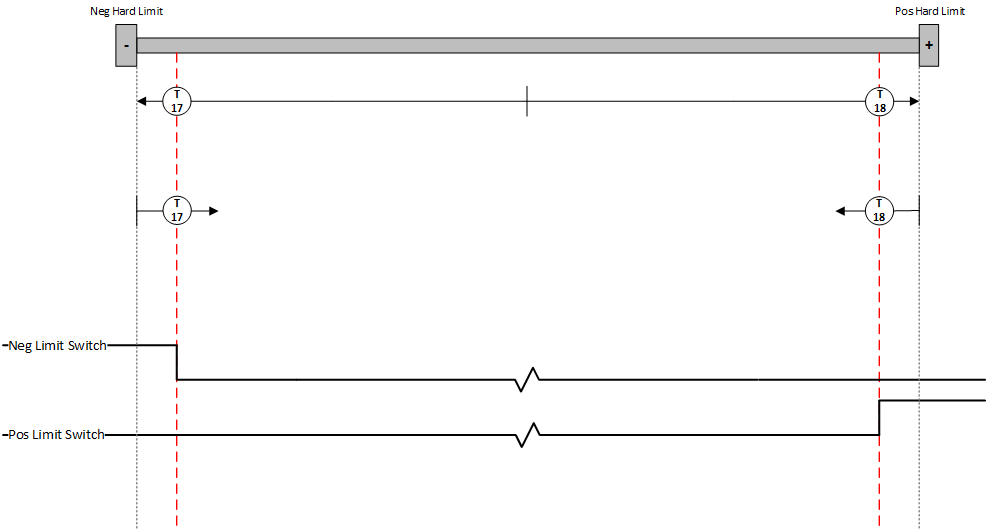
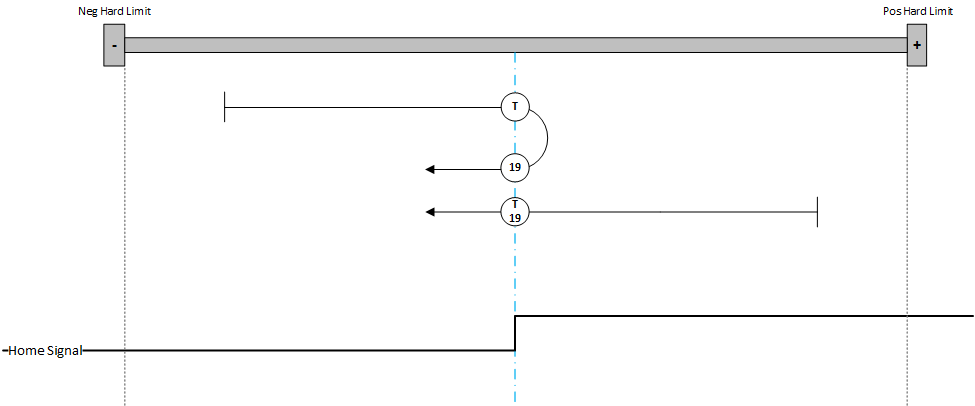
Value: 19 - Homing on the positive home switch
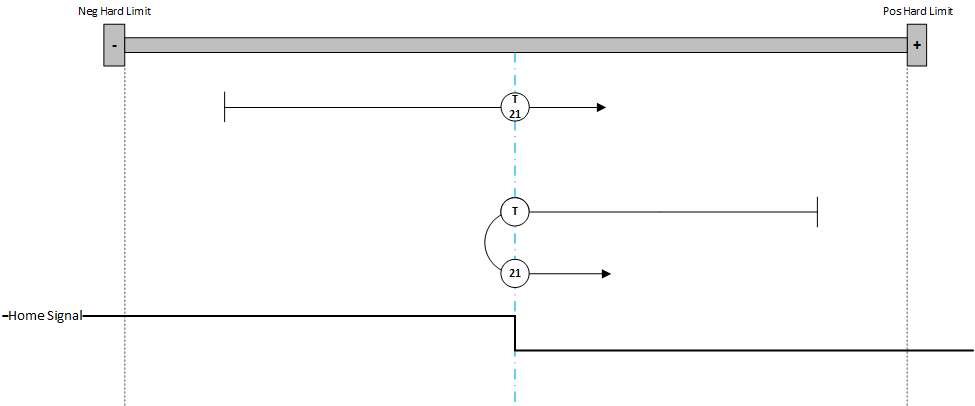
Value: 21 - Homing on the negative home switch
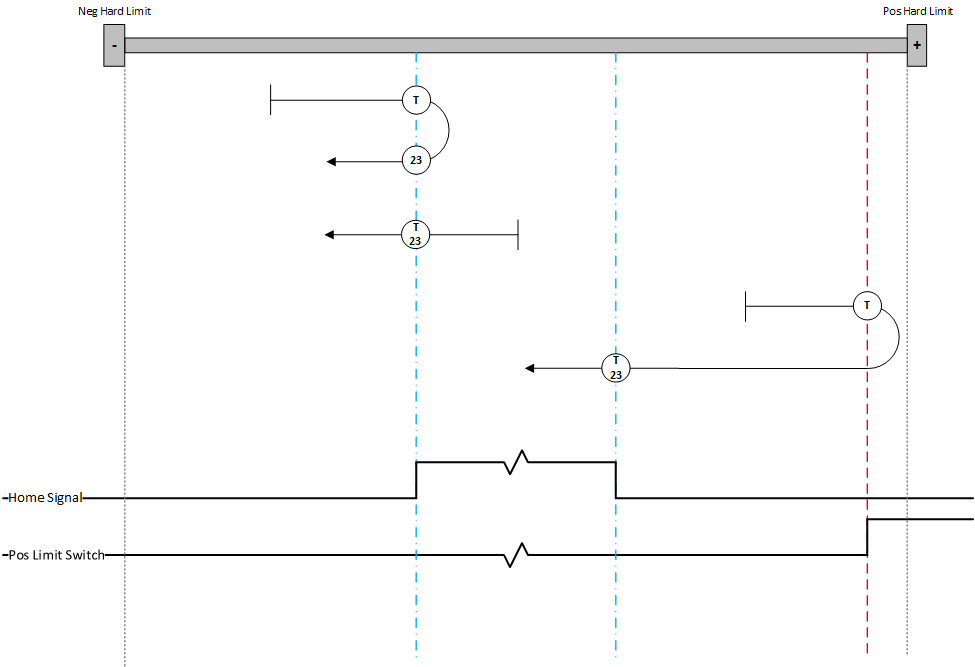
Value: 23 - Homing with the home switch input signal starting in the positive direction
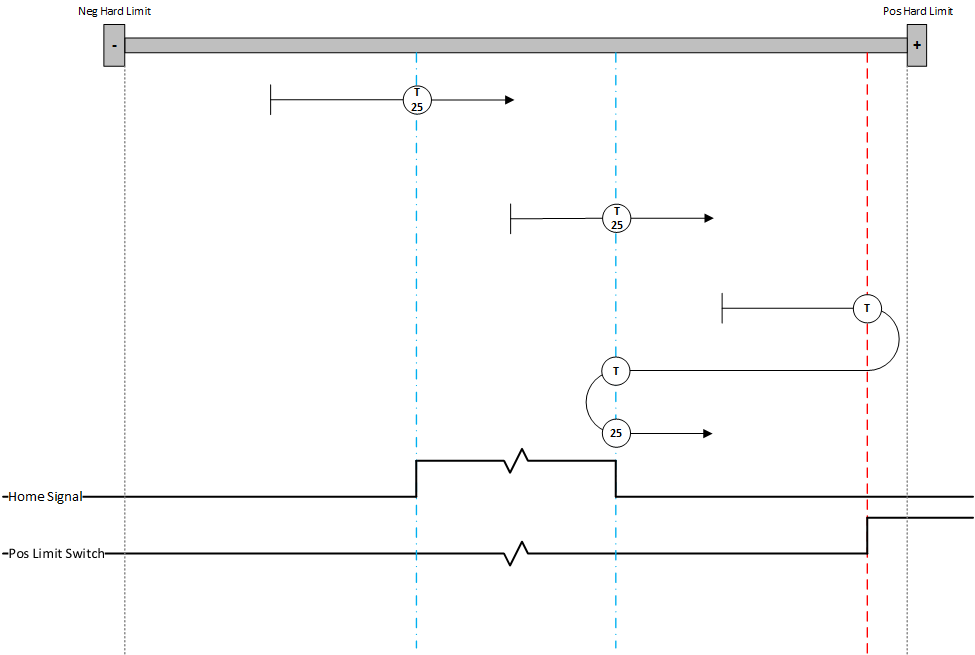
Value: 25 - Homing with the home switch input signal starting in the positive direction
Value: 27 - Homing with the home switch input signal starting in the negative direction
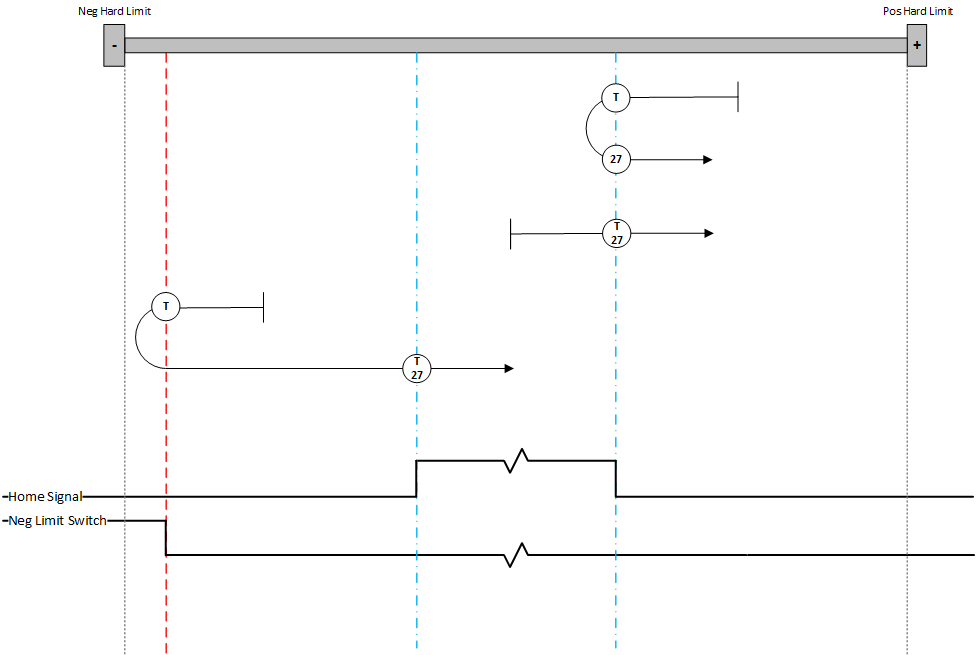
Value: 29 - Homing with the home switch input signal starting in the negative direction
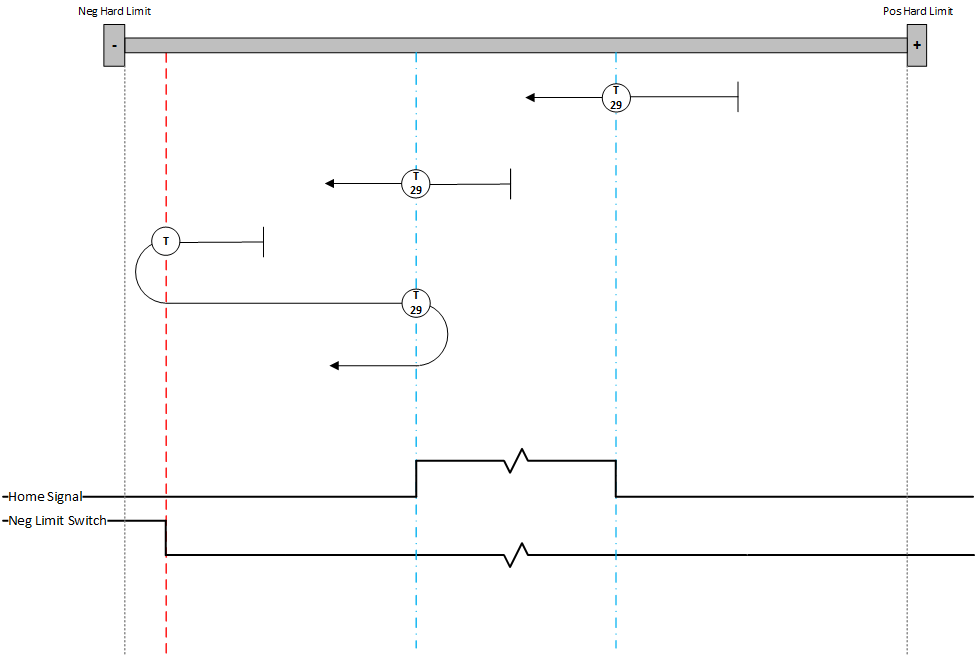
Value: 33 and 34 - Homing on the positive/negative index pulse of the current position

Value: 35 - Homing with the current position

Value: 36 and 37 - Homing on the negative/positive hard limit
