|
|
APIs, concepts, guides, and more
|
|
|
APIs, concepts, guides, and more
|
Use compensators to add delta offsets to an axis's position based on stored position data for compensating surface irregularities.
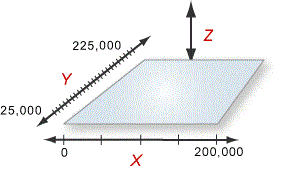
A compensator can be used to add a delta offset on the position of one axis based on the position of one or two axis. An example use case would compensating the Z (vertical) axis for X-Y surface irregularities.
In order for your compensator to work you will need to externally collect data on the Z axis deltas for each of the data points in your table. These measurements could be taken manually or if your machine has a touch probe you could write a program to build your compensation table for you.
The compensator works by adding an offset to the position of an axis based on positions stored in a table. This offset is applied right before data is sent do the drive and does not change command position. How data will be retrieved from the table is defined by a min, max, and delta for each input axis.
To configure a compensator, first define the X-Y area to be compensated (Xmin to Xmax, Ymin to Ymax). Then define the spacing of the data points points (delta) for the X and Y axes to determine the compensation table size.
The range in which the compensator will be applied is defined by the min and max. The delta defines the amount of travel between the next compensation value in the table. Linear interpolation is used between points. To determine the number of compensation points required you can use the following equations.
1D Compensation: Points = (positionMax-positionMin) / positionDelta + 1
2D Compensation: Points = PointsX * PointsY
For example:
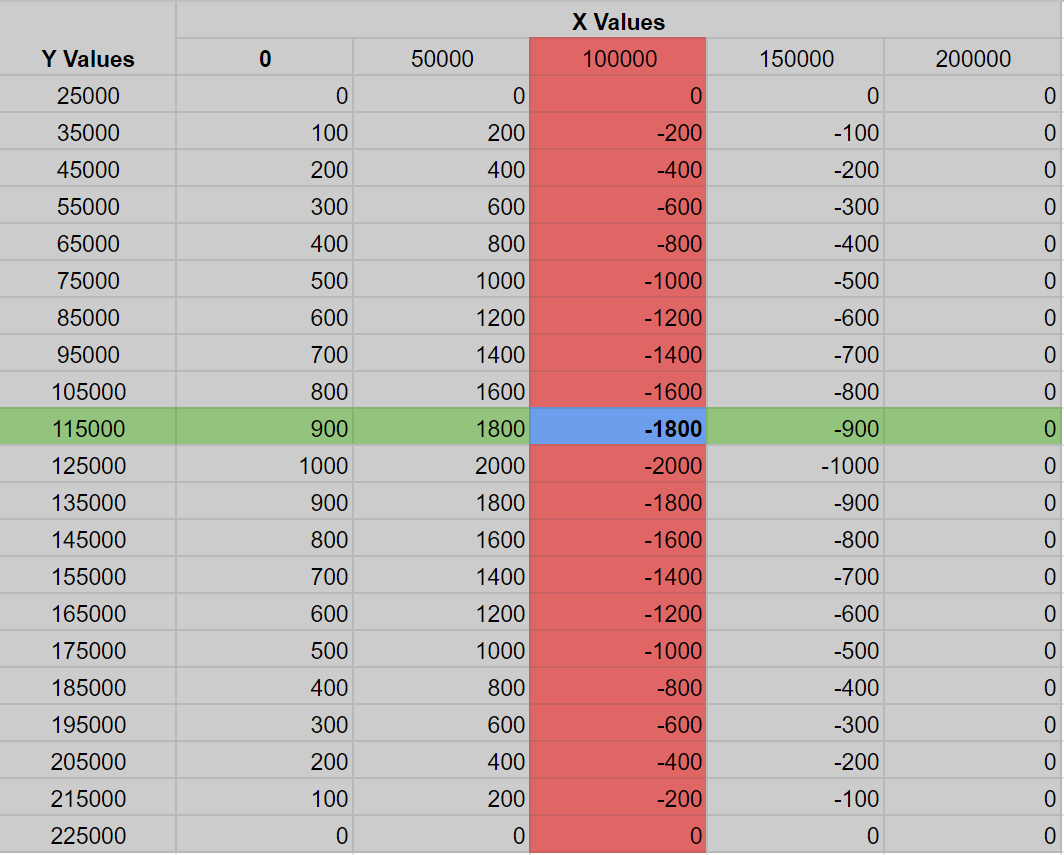
| Axis | Min | Max | Delta |
|---|---|---|---|
| X | 0 | 200000 | 50000 |
| Y | 25000 | 225000 | 10000 |
X_Points = (200000-0)/50000 + 1 = 5\ Y_Points = (225000-25000)/10000 +1 = 21
CompensatorPoints = X_Points * Y_Points = 105
Once you know the number of compensators you plan to use and the number of points in the respective tables the functions CompensatorCountSet and CompensatorPointCountSet to reserve memory in the motion controller for the compensator. This must be done before initializing objects that use dynamic memory (Like axes). This will reserve the space in memory on the motion controller. To check the amount of memory available for the compensator and other RSI objects you can check ExternalMemorySizeGet.
Once you have started the network you can call CompensatorConfigSet(...) to configure and enable your compensator. To disable your compensator you can use CompensatorDisable(...). For a full list of available functions see our RapidCode API.
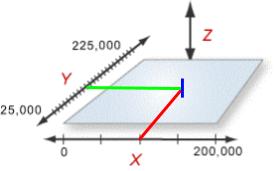
For example, if you were at X=100000 and Y=115000 The value of -1800 counts would be added to your Z target.
It is also possible to set up a compensator with the same input and output axis. Such compensators must be configured to use the input axis's command position as the actual position would cause a feedback loop.
An example use case for this feature would be correcting position errors caused by mechanical imperfections in an actuator.
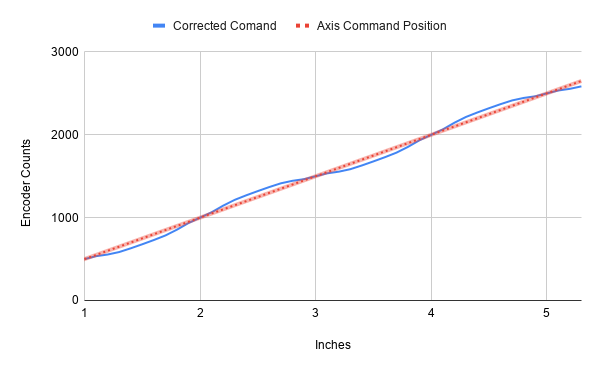
Here is an example of how a commanded position vs a corrected position graph could look for a single axis compensator.