APIs, concepts, guides, and more
Run a sample app in C#

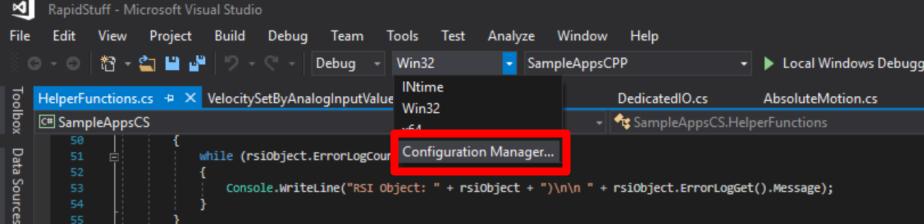
Learn how to run a sample app in C# using Visual Studio.


Precondition
Before getting started you may want to install an IDE (Integrated Development Environment).
The RapidCode API is designed to be compatible with any development environment.

We recommend the following IDEs based on programming language:

Our guides typically assume these IDEs, but the general steps provided should be applicable to any IDE you choose.

For Older Versions of RMP
Older versions of RMP may require different steps to run a sample app. If you are using one of the following versions, then refer to the appropriate guide.

- For versions in the range 8.x.x, see Run a sample app in C# (v8.x.x)

🔹 Create a Visual Studio Project

  1. Start Visual Studio 2019 and select Create a new Project
    image
  2. On the new window, search for console app and select Console App (.NET Framework)

    Warning
    Make sure your application is using the **.NET Framework** and not the **.NET Core** Framework.

    image

  3. Specify the Name and Solution Name for your project, then hit OK.

    Note
    Name: This will be the name given to your Namespace/Package/Project. The Project file contains all the information of a project/package/namespace, such as its settings and specially the .cs files (this are your C# applications) in the project.
    Solution Name: This will be the name given to the container for the projects/packages/namespaces and the configurations the projects can build in. A solution is a structure for organizing projects in Visual Studio. The solution maintains the state information for projects in .sln (text-based, shared) and .suo (binary, user-specific solution options) files.
    For more: visit → Introduction to projects and solutions

    image

    1. The new project will appear in the Solution Explorer: image
  4. If the Program.cs file is not open in the Code Editor, open the shortcut menu for Program.cs in Solution Explorer, and then choose View Code.
  5. Replace the contents of Program.cs with the following code.

    // A Hello World! program in C#.
    using System;
    namespace HelloWorld
    {
    class Hello
    {
    static void Main()
    {
    // Print to console.
    Console.WriteLine("Hello World!");
    // Print to console.
    Console.WriteLine("Press any key to exit.");
    // Keep the console window open until a key is pressed.
    Console.ReadKey();
    }
    }
    }
  6. Choose the F5 key to run the project. A Command Prompt window appears that contains the line:

    Hello World!

Image

🔹 Add a Sample App to Your Project

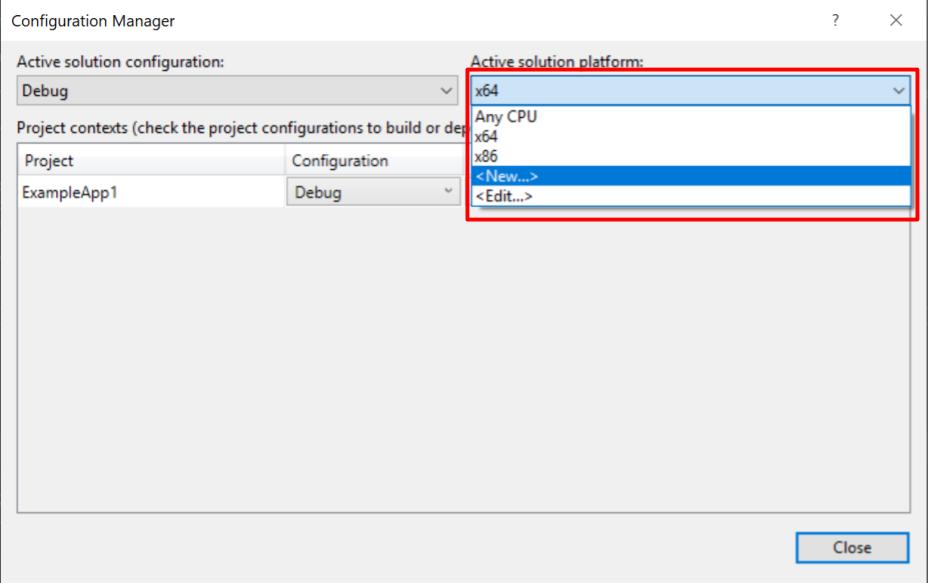
What files do I need to setup my C# project?

➡️ 32-bit
RapidCode.NET.dll → [32bit] - .NET Framework 4.5 DLL
RSI.System.dll → [32bit] - (only if using the Axis XML API)

Note
RSI.System.dll is not needed, but some users might want to save Axis configurations that are not stored in the motion controller such as user units.

➡️ 64-bit
RapidCode64.NET.dll → [64bit] - .NET Framework 4.5 DLL
RSI.System64.dll → [64bit] - (only if using the Axis XML API)

Note
RSI.System64.dll is not needed, but some users might want to save Axis configurations that are not stored in the motion controller such as user units.

  1. In Solution Explorer (open on View Tab or hit ctrl+alt+L) right click on the name of your project, then click on Add, then click on Class for the Visual C# Items section.
    Image
  2. Change the Name of your class to the name of the Sample App that you want to use and hit Add.

    Note
    For example, if you would like to use our Absolute Motion sample app, then the name of your class will be AbsoluteMotion.cs.
    Image
    1. After you click Add, you should be seeing something like this: Image
  3. Add the RapidCode.NET.dll as a reference to your project.
    1. On the top menu click on Project, then click on Add Reference… Image
    2. Once the Reference Manager window opens, browse for the RapidCode.NET.dll file in your RapidSetup Folder, and click OK. (Make sure the checkbox is checked) Image
    3. Verify that the RapidCode.NET.dll library has been added to your References. Image
  4. Select your platform
    Note
    32 bit — RapidCode.NET.dll — x86
    64bit — RapidCode64.NET.dll — x64
    1. Open the platform Configuration Manager Image
    2. Select the appropriate platform. If not available select <New...> Image
  5. Set the working directory
    1. Go to the Debug section of the project properties and select all configurations. Set the platform to match that of your .dll file. Set the working directory to the location you installed RMP. Image
    2. Set build path: Image
  6. Replace the contents of AbsoluteMotion.cs with the following code.

    using System;
    using RSI.RapidCode.dotNET; // Import our RapidCode Library.
    namespace SampleAppsCS
    {
    class AbsoluteMotion
    {
    static void Main(string[] args)
    {
    // RapidCode Objects
    MotionController controller; // Declare what controller is.
    Axis axis; // Declare waht axis is.
    // Constants
    const int AXIS_NUMBER = 0; // Specify which axis/motor to control.
    const int POSITION = 10; // Specify the position to travel to.
    const int USER_UNITS = 1048576; // Specify your counts per unit / user units. (the motor used in this sample app has 1048576 encoder pulses per revolution)
    const int VELOCITY = 1; // Specify your velocity. - units: Units/Sec (it will do 1048576 counts/1 revolution every 1 second.)
    const int ACCELERATION = 10; // Specify your acceleration. - units: Units/Sec^2
    const int DECELERATION = 10; // Specify your deceleration. - units: Units/Sec^2
    // Initialize RapidCode Objects
    controller = MotionController.CreateFromSoftware("C:\\RSI\\X.X.X\\"); // Insert the path location of the RMP.rta (usually the RapidSetup folder) (This sample app used RMP 7.1.1).
    SampleAppsCS.HelperFunctions.CheckErrors(controller); // [Helper Function] Check that the controller has been initialize correctly.
    SampleAppsCS.HelperFunctions.StartTheNetwork(controller); // [Helper Function] Initialize the network.
    //controller.AxisCountSet(1); // Uncomment if using Phantom Axes.
    axis = controller.AxisGet(AXIS_NUMBER); // Initialize Axis Class. (Use RapidSetup Tool to see what is your axis number)
    SampleAppsCS.HelperFunctions.CheckErrors(axis); // [Helper Function] Check that the axis has been initialize correctly.
    try
    {
    axis.UserUnitsSet(USER_UNITS); // Specify the counts per Unit.
    axis.ErrorLimitTriggerValueSet(1); // Specify the position error limit trigger. (Learn more about this on our support page)
    axis.PositionSet(0); // Make sure motor starts at position 0 everytime.
    axis.Abort(); // If there is any motion happening, abort it.
    axis.ClearFaults(); // Clear faults and enable axis.
    axis.AmpEnableSet(true); // Enable the motor.
    Console.WriteLine("Absolute Move\n\n");
    Console.WriteLine("Trapezoidal Profile: In Motion...\n");
    //axis.ErrorLimitActionSet(RSIAction.RSIActionNONE); // Uncomment when using Phantom Axes.
    axis.MoveTrapezoidal(POSITION, VELOCITY, ACCELERATION, DECELERATION); // Command simple trapezoidal motion.
    axis.MotionDoneWait(); // Wait for motion to be done.
    Console.WriteLine("Trapezoidal Profile: Completed\n\n"); // If motion is completed this will be printed out.
    axis.AmpEnableSet(false); // Disable the motor.
    Console.WriteLine("\nTest Complete\n");
    // Keep the console window open until a key is pressed.
    Console.ReadKey();
    }
    catch (Exception e)
    {
    Console.WriteLine(e.Message); // If there are any exceptions/issues this will be printed out.
    }
    }
    }
    }
    void UserUnitsSet(double countsPerUserUnit)
    Sets the number of counts per User Unit.
    Axis * AxisGet(int32_t axisNumber)
    AxisGet returns a pointer to an Axis object and initializes its internals.
    static MotionController * CreateFromSoftware()
    Initialize and start the RMP EtherCAT controller.
    Warning
    You will notice that all of our sample apps use the HelperFunctions class. The HelperFunction class is not included with our API, but we have made that code available in our concept pages and in our API docs so you can copy and paste it into your project and reuse it.
    Note
    More motion samples can be found here.
  7. Make sure that INtime is running and that your motor/axis has been set up correctly in RapidSetup.
  8. If the axis has been set up correctly, hit the F5 key to run the project.