APIs, concepts, guides, and more
Add an extra Node (optional)

Add NodeB to your INtime setup.

Warning
This is optional and required only for specific features.

šŸ”¹ 1. INtime (NodeB)

1.1 - Create New Node

1.1.1 Open the Intime Configuration tool and select Node Management.

Image

1.1.2 Click the "New Node**"** button and:

Image

  • Set Node name āž NodeB
  • Select Node type āž Local
  • Click "OK"

Image

1.2 - Configure Kernel

1.2.1 Select "Kernel" tab and:

  • Set the Kernel memory (in MB) āž 512
  • Set the Kernel Clock Rate (in us) āž 50
  • Click "Save".

Image

1.3 - Configure Auto Load Settings

1.3.1 Select "Auto Load" tab and:

  • Check the "Enable Auto Load" checkbox.
  • Enable the "Network" setting.

Image

1.4 - Configure the NIC

1.4.1 Select "Network" tab and:

  • Click on the 3-dots to the right of "NIC list" setting.
  • Select type "Virtual Ethernet (ven)".
  • Check the "Enable DHCP" checkbox.
  • Press "OK".
  • Restart PC.

Image

Image

šŸ”¹ 2. Networking Setup

2.1 - Configure Internet Connection Sharing (ICS) Settings

2.1.1 Navigate to _"Control Panel\Network" and "Internet\Network Connections"._ (See below)

Image

2.1.2 Right-click on your newly created INtime Ethernet Driver and select "Properties".

Image

2.1.3 Select the "Sharing" tab and:

  • Check the "Allow other network users to connect.." checkbox.
  • Select your TenAsys Virtual Ethernet Adapter.
  • Press OK.

Image

2.2 - Windows 10 Internet Connection Sharing (ICS) Reboot Fix

Note
Windows 10 has an issue where it loses its sharing settings (set up above) after a reboot. To prevent this from happening, windows recommends adding a registry key and changing some service properties.
For more info visit Microsoft's docs and/or this article.
  • Command Prompt Steps

    STEP 1 - Create a new DWORD registry subkey

    3.2.3 Enter the command āž

    REG ADD HKLM\Software\Microsoft\Windows\CurrentVersion\SharedAccess /v EnableRebootPersistConnection /t REG_DWORD /d 1

    STEP 2 - Change the Service Internet Connection Sharing (ICS) Startup type to Automatic

    3.2.2 Enter the command āž sc config SharedAccess start=auto

  • Manual Steps

    STEP 1 - Create a new DWORD registry subkey

    3.2.1 Open the "Registry Editor", you can just search for it or hit (WindowKey+R) to open the run prompt and type regedit.

    Registry Editor

    3.2.2 Navigate to _HKEY_LOCAL_MACHINE\Software\Microsoft\Windows\CurrentVersion\SharedAccess_

    Navigate Registry

    3.2.3 Create a new DWORD (32-bit) registry subkey with:

    • Name āž EnableRebootPersistConnection
    • Value āž 1

    Create DWORD Additional Step

    STEP 2 - Change the Service Internet Connection Sharing (ICS) Startup type to Automatic

    3.2.4 Open "Services", you can just search for it.

    Services

    3.2.5 Once open, scroll down to the ā€œiā€ section and look for Internet Connection Sharing (ICS) and right-click on its "Properties".

    ICS Properties

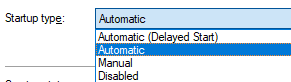
    3.2.6 In the Properties menu:

    • Set "Startup type" āž Automatic

    Set Startup Type

    • Click "Apply and OK".